Users are people you have requested to be associated with your accounts such as delegates or signatories. If you would like to add or remove users you will need to call us on 0800 872 226.
You can manage the Online Banking permissions for your users. This controls what they can see and do with your account when using Online Banking.
Note: Depending on the permissions granted, users may or may not see information for an account they are delegated to.
Add or Remove a User
If you need to add or remove a user permanently, give us a call on 0800 872 226.
How to view users
- Click on Settings in the main menu
- Select Users to see a list of all users associated with your accounts
- If you don't see the Users menu, there are no users associated with your account. Call us on 0800 872 226 to make any changes.
-
When you view the users menu you will see two tabs
- Users: View and manage permissions for all your users
- Templates: View all access level templates you have saved. Access level templates are a set of permissions you have saved and can apply to your users
- For each user you can see the following:
- Name of user
- Access Status: only users that show as Enabled will be able to access your accounts in Online Banking - see Enable / Disable users for more details on how to change this status.
- The action menu (the 3 dots) next to a user allows you to manage:
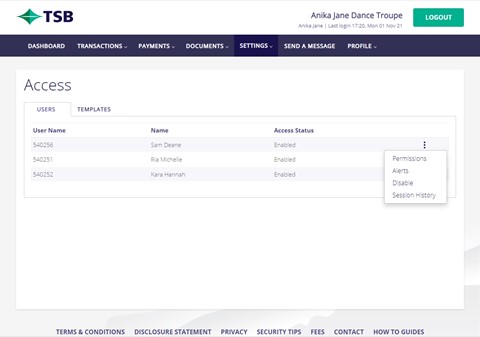
- Permissions: set and change what your user can see and/or do for each of your accounts.
- Alerts: set alerts when your user undertakes certain actions via Online Banking on your accounts.
- Enable / Disable: depending on the status of your user you will be able to enable or disable them via this option.
- Session History: view the session history for your user on your accounts.
How to set or change a users permissions
Set or change user permissions
- Click on Settings in the main menu
- Select Users
- Click the action menu (the 3 dots) next to the user you would like to set permissions for and click Permissions
- You will be taken to the users permissions page
- Here you can see all your accounts
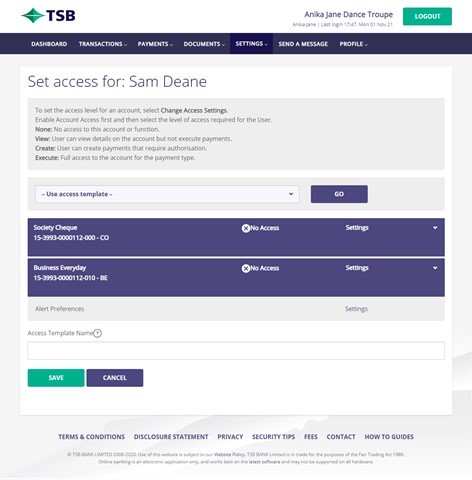
- For each account you will need to undertake the following
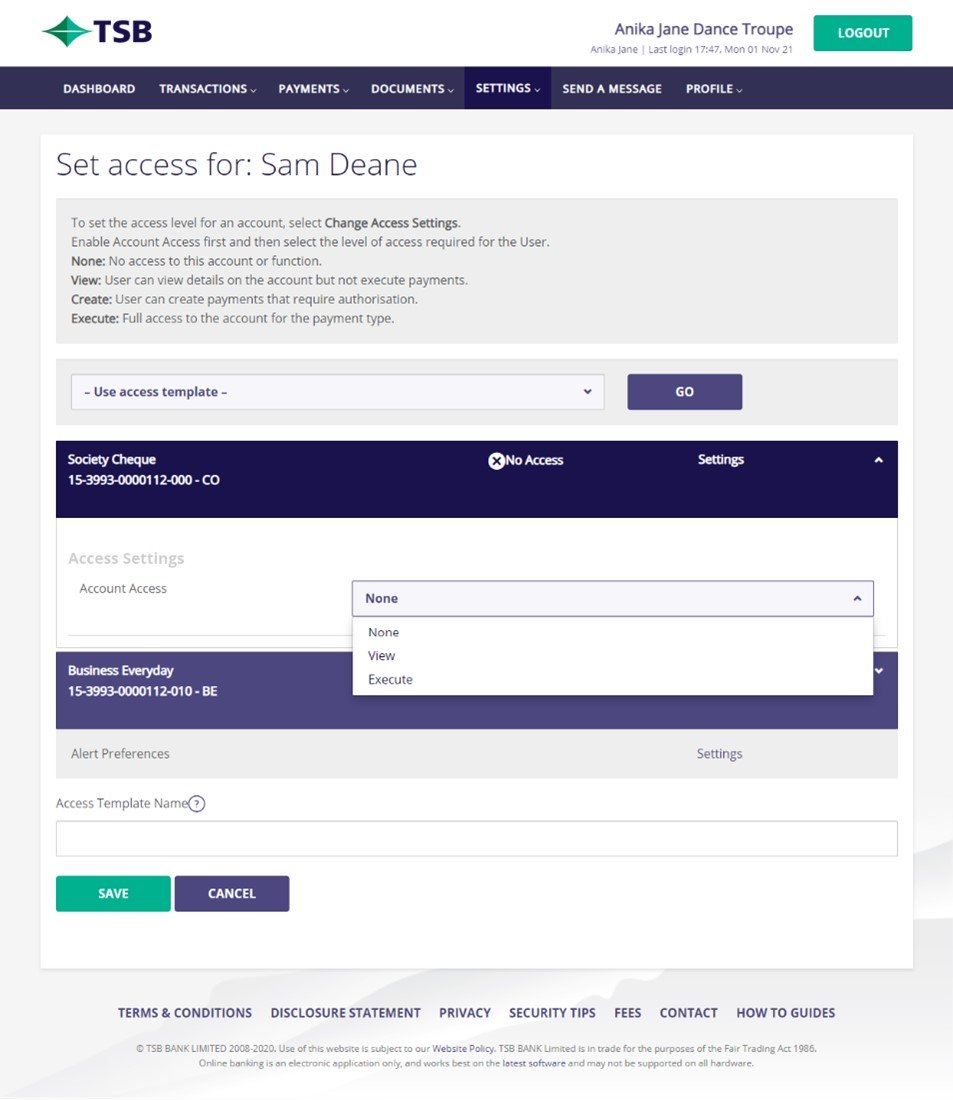
- Select the Account Access option for the user
Account access determines the level of access your user will have for that account. You have the following options:
- None: selecting this option won't allow you to set any permissions to the account for the user.
- Execute: selecting this option will allow you to set view, create & execute options for each feature available to the account for the user. See option 1 below for more details on how to set the permissions.
- View: selecting this option will allow you to set view options for each feature available to the account for the user. See option 2 below for more details on how to set the permissions.
Setting the permissions for the account
Option 1: Giving create and/or create and execute options to a user
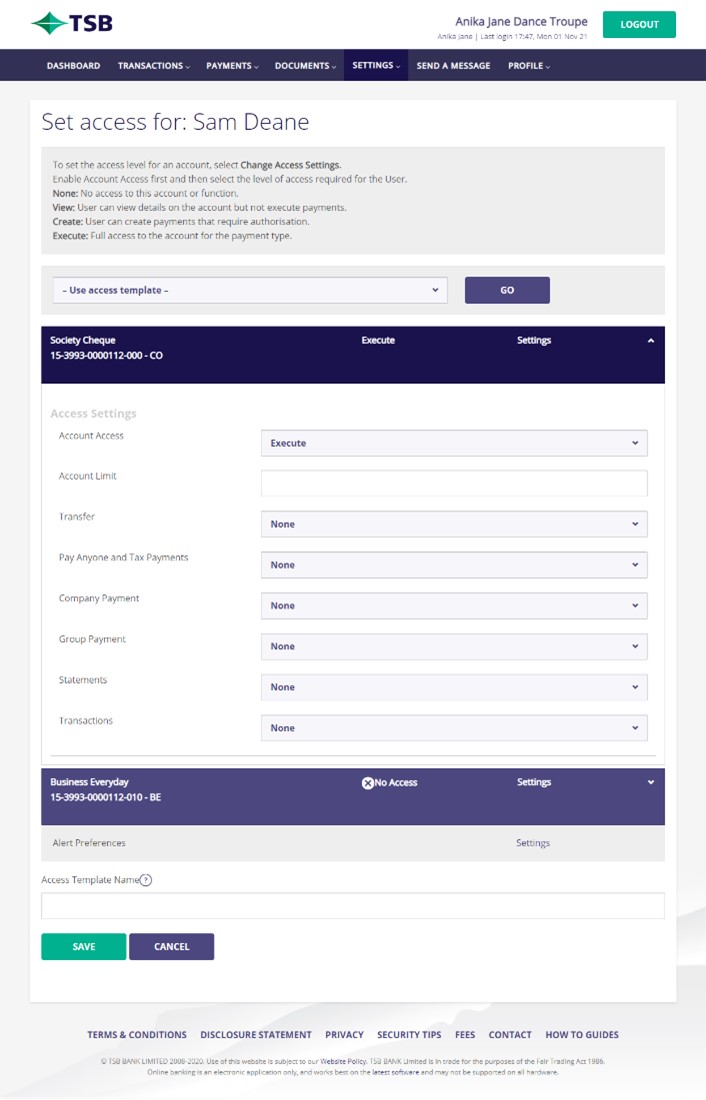
If your user has 'Execute' for the Account Access, you can set the following additional permissions for your account:
Account Limit: This is used to restrict your user from being able to make unlimited transactions from your account. The limit set applies across all transaction types as a combined total.
This only shows if you have set Account Access to Execute and the account is able to have payments made from it.
You'll need to set a dollar limit for each account for each user, if a dollar limit is left blank or set to zero, the user will not be able to undertake any transactions.
Transfers
This feature will only show if the account selected can have transfers made from it. You can choose to allow your user to:
- View: Allow user to see transfers
- Create: Allow user to create transfers
- Execute: Allow user to create and approve a transfer
Payments
This feature will only show if the account selected can have payments made from it. You can choose to allow each user to:
- View: Allow user to see payments
- Create: Allow user to create payments
- Execute: Allow user to create and approve payments
Company Payments
This feature will only show if the account selected can have payments made from it. You can choose to allow this user to:
- View: Allow user to see company payments
- Create: Allow user to create company payments
- Execute: Allow user to create and approve a company payments
Group Payments
This feature will only show if the account selected can have group payments made from it. You can choose to allow this user to:
- View: Allow user to see group payments
- Create: Allow user to create group payments
- Execute: Allow user to create and approve group payments
Group Debits
This feature will only show if the account selected can have group debits made from it and you are set up to use group debits. You can choose to allow this user to:
- View: Allow user to see group debits
- Create: Allow user to create group debits
- Execute: Allow user to create and approve group debits
Statements
You can choose to allow this user to:
- View: Allow user to see all statements for this account
Transaction Search
You can choose to allow this user to:
- View: Allow user to see all transactions for the account and download these
Option 2: Giving View Only access to a user
If you have selected your user have "View" for the Account Access you can set the following additional permissions for your account also:
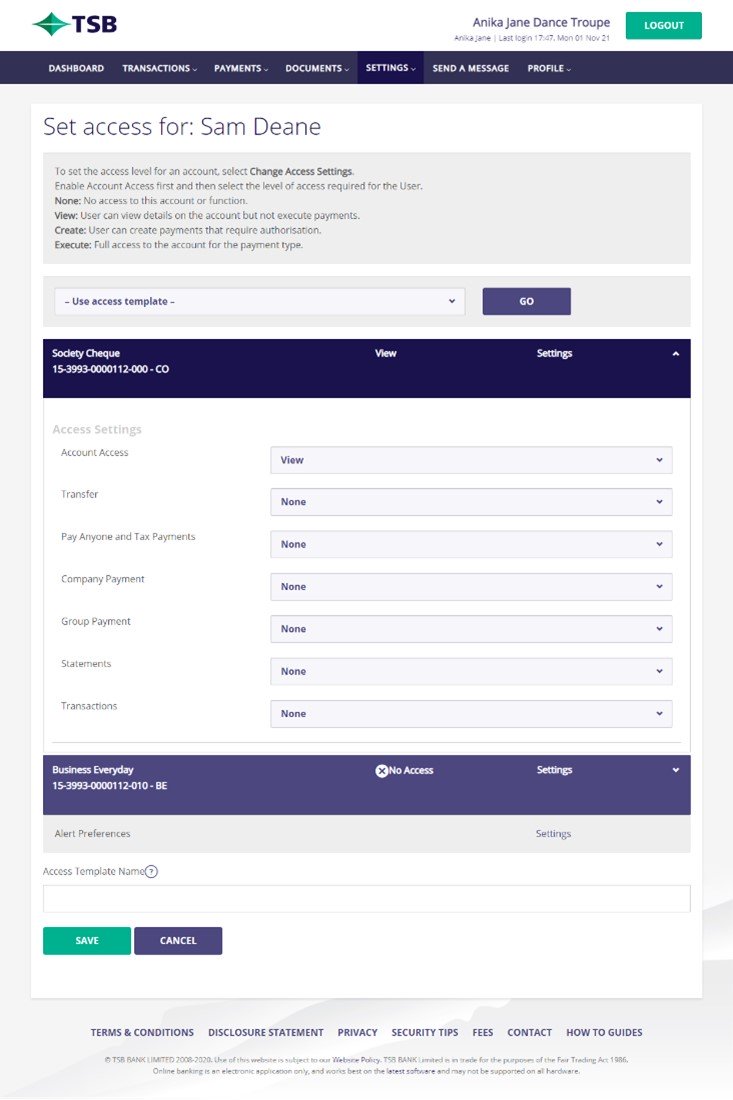
Transfers
This feature will only show if the account selected can have transfers made from it. You can choose to allow your user to:
- View: Allow user to see transfers
Payments
This feature will only show if the account selected can have payments made from it. You can choose to allow each user to:
- View: Allow user to see payments
Company Payments
This feature will only show if the account selected can have payments made from it. You can choose to allow this user to:
- View: Allow user to see company payments
Group Payments
This feature will only show if the account selected can have group payments made from it. You can choose to allow this user to:
- View: Allow user to see group payments
Group Debits
This feature will only show if the account selected can have group debits made from it and you are set up to use group debits. You can choose to allow this user to:
- View: Allow user to see group debits
Statements
You can choose to allow this user to:
- View: Allow user to see all statements for this account
Transaction Search
You can choose to allow this user to:
- View: Allow user to see all transactions for the account and download these.
Setting Alert options
You can select to receive alerts based on the actions this user has taken on the accounts you have given them permissions to.
- Click on Settings on the Alert Preferences row
- In the pop-up window select the actions for this user that you want to receive alerts on when they undertake them.
- Click Save
- You will be returned to the permissions screen for that user.
Save as template
You can save the permissions you have set for the accounts as a template that you can use when creating other users.
- Give the template a name
Save permissions for the user
- Once you have set all the permissions click save.
How to enable or disable a user
Users need to be enabled before they can see or do anything with your accounts in Online Banking. If you temporarily want to stop a user having access to your accounts, you can disable them.
Disable a user
Disabling a user will remove the users ability to view and/or transact on your accounts via Online Banking.
- Go to Settings in the main menu
- Select Users
- Click the action menu (the 3 dots) next to the user you would like to disable and click Disable
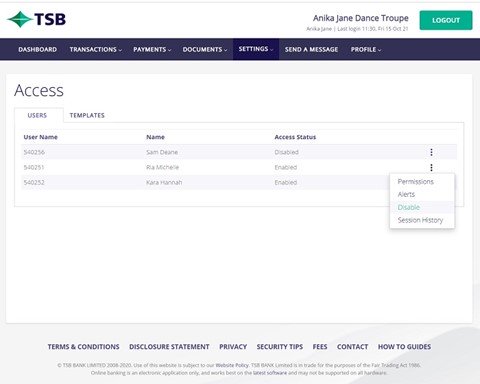
- Click Confirm on the pop-up window to action the disable the user.
- The user status will now show as disabled.
Enable a user
Enabling a user will give them the ability to view and/or transact on your accounts via Online Banking based on the permissions you have granted.
- Go to Settings in the main menu
- Select Users
- Click the action menu (the 3 dots) next to the user you would like to enable and click Enable
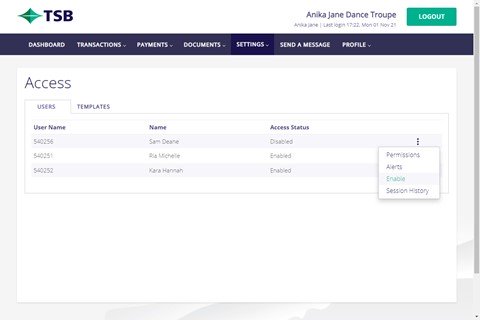
- Click Confirm on the pop-up window to action the enable of the user.
- The user status will now show as enabled.
How to use access templates
Access templates are handy for saving a set of permissions for your account that you use often. They are easy to set up and can be applied to any user.
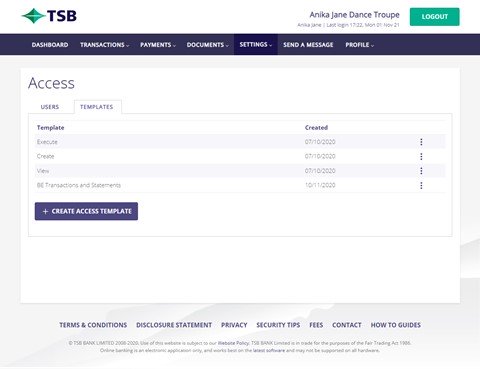
Viewing access templates
- Select Users from the main menu
- Click on the Templates tab
- You will see the following screen

- You can see the name of the template
- You can see the date the template was created
- Using the action menu (the 3 dots) next to a template you can use this to edit or delete an access template
- You can choose to create an access template
Create an Access Template
- Select Users from the main menu
- Click on the Templates tab
- Click Create
Set the Access Templates Permissions
- You will be taken to a page with all your accounts listed
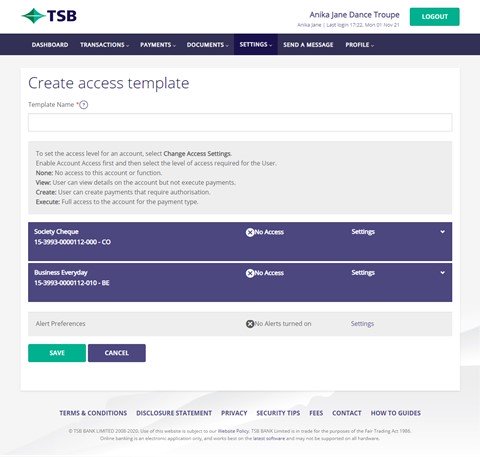
- Enter a name for the group of permissions you are creating
- Set the permissions for each account as required for this group of permissions
- Select any alerts you want to receive for users who you set up with this set of permissions
- When completed click Save
Save an Access Template
- Once an access template is saved you will be returned to the Users page and shown a success message.
- A list of access templates will be shown.
Use an Access Template
- Select Users from the main menu
- Click on the Users tab
- Click the action menu (the 3 dots) next to the user you would like to use this template on and click Permissions
- The users permissions page will load
- Select the dropdown where it says Use access template
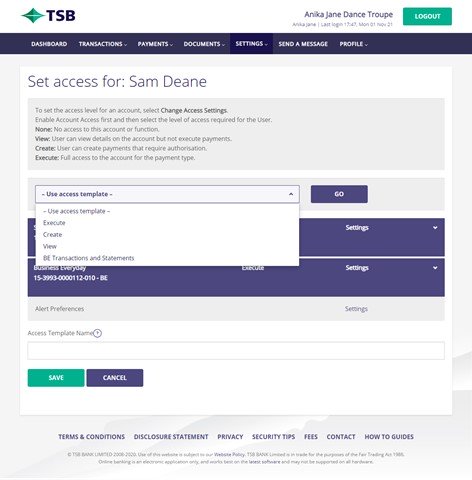
- Select the access template you want to apply, then click go
- Click Confirm on the pop-up window to action the change
- The permissions from the template will now be loaded on the page for the user.
- You can edit the permissions, if you have some specific changes for that user.
- When you're ready, click save. The permissions are now applied to the user and you are returned to the Users screen.
- If your user is not already enabled, you will need to do this before they can see any or do anything with your accounts via Online Banking. Find out how here.
Edit an Access Template
- Select Users from the main menu
- Click on the Templates tab
- Click the action menu (the 3 dots) next to the Access template that you would like to edit and click Edit
- Make the changes to the template as required
- Click Save once you are done, you will be returned to the templates tab and a success message is shown.
Please Note: Any changes made to an access template are not reflected on any users whose permissions were created using the template. They will need to be made on the individual users.
Delete an Access Template
- Select Users from the main menu
- Click on the Templates tab
- Click the action menu (the 3 dots) next to the Access template that you would like to edit and click Edit
- Click Confirm on the pop-up window to action the removal
Please Note: Deleting an access level template does not remove or change the permissions of users who were set up with this template. You will need to edit those users individually.